1. Quick Start
Your gateway comes pre-installed with the latest Debian Linux operating system image. To get started, you will need:
1.1. Connect over serial console
USB Type-A (or Type-C, depending on the host computer) to USB Type-B micro cable
Host PC/Mac to connect from (Windows/Linux/macOS)
Terminal emulator application (we recommend
PuTTYon Windows;picocomon macOS; orpicocomon Linux)12/24 V power supply
To get started with a serial connection:
Connect a USB Type-A (or Type-C, depending on your host computer) to USB Type-B micro cable between the “Console” port on the gateway and your PC or Mac.
Power the device using the DC power input or PoE (if supported). Turn the power plug clockwise to lock the plug if using the DC power input. Make sure to use a 12/24 V power supply [1]. You should see the green power LED light up. If not, long-press and release the power button.
On your host PC, start a terminal emulation program with the following serial port settings:
Baudrate: 115200
Data bits: 8 (this is usually the default)
Stop bits: 1 (this is usually the default)
Parity: None (this is usually the default)
Flow control: None (this is usually the default)
Port: Select the correct port associated with the device
The terminal emulation program should start to display output from the gateway. When asked to login [2], use the username ct and password cthingsco [3].
1.2. Connect over SSH
Alternatively, you may instead prefer to connect to the device over an SSH connection. If you’d like to do so, you will need:
Host PC/Mac to connect from (Windows/Linux/macOS)
Ethernet cable
Ethernet router with DHCP enabled (not required if setting up manual ad-hoc network with DHCP)
Utility to find IP address of device (we recommend
Angry IP Scanneron Windows andnmapon Linux/macOS)SSH application (we recommend
PuTTYon Windows andsshwithin WSL on Windows or on Linux/macOS)12/24 V power supply
To get started with an SSH connection:
Power the device using the DC power input or PoE (if supported). Make sure to use a 12/24 V power supply [1]. You should see the green power LED light up. If not, long-press and release the power button.
Connect an Ethernet cable between the gateway (any port) and your router. Additionally, connect your host computer to it (via either cable or Wi-Fi). If you are connecting a cable directly from your computer to the gateway or via only a switch, you must set up an ad-hoc network with DHCP server on your host. On Windows and macOS, this can be accomplished by “sharing your internet connection”. Refer to your Operating System’s documentation for more details.
Figure out the IP address of the gateway. If your router has an administration page, this information can be found there. If using an IP scanning utility, scan your local network’s IP range. For example:
nmap -sn 192.168.1.0/24.Establish an SSH connection to the IP address over port 22.
When asked to login [2], use the username ct and password cthingsco [3].
1.3. Custom APN Configuration
On the CTHINGS.CO Debian Linux image, cellular connectivity for SIMCOM modules is configured automatically. In most cases, no manual setup is required — the system detects the modem and applies the correct parameters.
If your cellular provider requires a custom Access Point Name (APN), you can set it manually using the following steps.
Write the desired APN to the dedicated configuration file:
$ echo "mynewapn" | sudo tee /etc/cthings-lte-apn
Remove the existing LTE configuration marker:
$ sudo rm /etc/cthings-lte-mark
Reboot the device to apply the new APN:
$ sudo reboot
After the reboot, the system will automatically reconfigure the modem using the new APN.
1.4. Connector Overview
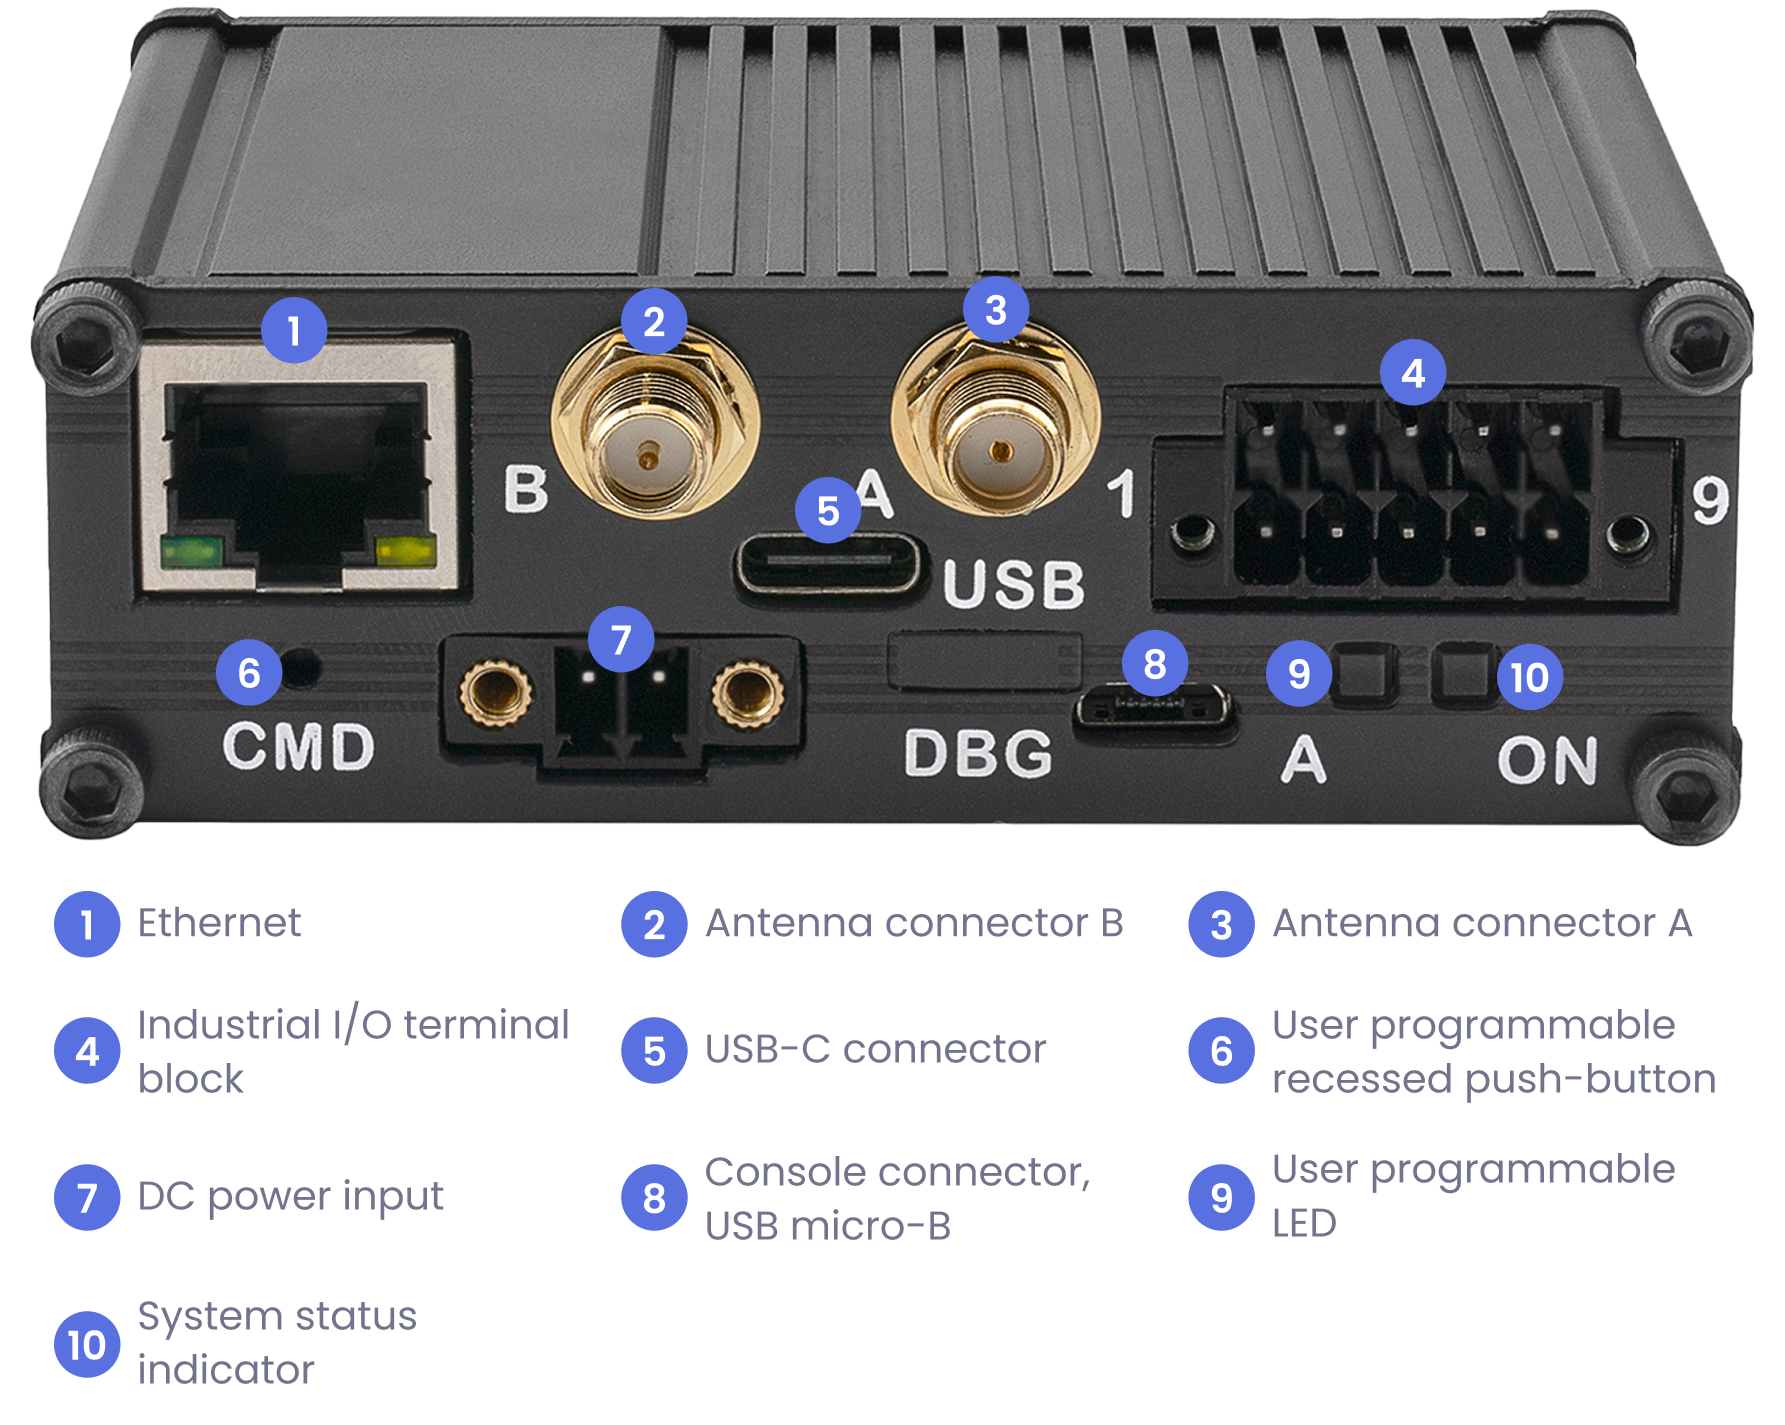
Device I/O
Footnotes